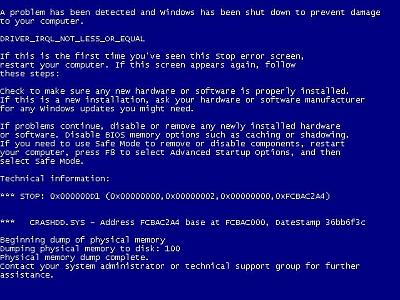
Blue screen errors, or blue screen of death (BSOD) errors, are the most severe errors Windows can encounter. Since Windows can not recover from this kernel level error, a blue screen is displayed with the error details. The error details contain a STOP error code, which indicates the type of error.
There are a lot of possible causes for blue screen errors, but most of them relate to the computer hardware. The cause of a BSOD error can be a temperature problem, a timing error, a resource conflict, hardware failure, a corrupt registry, a virus or simply a device incompatibility or driver error.
How to analyze blue screen errors
The first thing to do to analyze a blue screen error is to check the meaning of the STOP error code. You need to stop Windows from rebooting when a STOP error is encountered. Once the blue screen of death is shown, you can check the meaning of the STOP error code. Together with the filename of the driver or module, this will give an indication of the error cause.
Another option to analyze the cause of the blue screen error is to look at the Windows system event log or to debug the memory dump (minidump) that Windows created when the error occurred. The event log can be viewed using the event viewer. Right-click Computer in the Start menu, and then select Manage. In the Computer Management window select Event Viewer. The information in the event log can be of great help to isolate the cause of the blue screen error.
Reading the minidump requires a bit more technical knowledge, but Microsoft has tools to read the minidump.
The most common cause of blue screen errors
In reality, the most common cause of blue screen errors is a device driver problem. Outdated, incorrect or corrupt drivers can cause the system to encounter a STOP error, resulting in the BSOD.
So the easiest way to try and fix a blue screen error is to reinstall and update your system’s device drivers. This will ensure that all driver bugs are fixed and that all hardware has the correct driver.
If you know which device caused the error, you can update or reinstall that driver first. The file name in the blue screen of death can help identify the driver. Look for a file with the .SYS extension and search for that file name.
If you do not have the drivers for all devices, or are not comfortable updating your PC’s drivers manually, you can use a driver update tool to find, download and update all device drivers for you. Such tools will accurately identify your computer hardware, including any device causing an error, and automatically install the latest drivers for it.
In most cases updating or reinstalling drivers will solve your blue screen errors.
Other causes of blue screen errors
However, if updating device drivers does not fix the blue screen error, there are a number of additional things to try:
- Load the default BIOS values – resource conflicts and timing issues can be caused by incorrect BIOS settings.
- Update the BIOS – especially after adding new hardware or installing a Windows service pack this can help fix issues.
- Update Windows – missing updates, including service packs can be a source of stop errors.
- Check your system – run a virus scan and spyware scan after updating your definition files.
- Run a memory test to check your computer’s RAM. Memory faults can easily cause blue screen errors, so see if your RAM is error free. Vista and Windows have a built-in option to test the memory, for XP you can use a program called memtest86.
- Driver rollback – if you have recently updated a driver, you can use the driver rollback to revert back to the previous driver version.
- Stop 0×00000003 UNSYNCHRONIZED_ACCESS
- Stop 0x0000000A IRQL_NOT_LESS_OR_EQUAL
- Stop 0x0000001E KMODE_EXCEPTION_NOT_HANDLED
- Stop 0×00000023 FAT_FILE_SYSTEM
- Stop 0×00000024 NTFS_FILE_SYSTEM
- Stop 0x0000002E DATA_BUS_ERROR
- Stop 0x0000003F NO_MORE_SYSTEM_PTES
- Stop 0×00000044 MULTIPLE_IRP_COMPLETE_REQUESTS
- Stop 0×00000050 PAGE_FAULT_IN_NONPAGED_AREA
- Stop 0x0000006B PROCESS1_INITIALIZATION_FAILED
- Stop 0×00000073 CONFIG_LIST_FAILED
- Stop 0×00000074 BAD_SYSTEM_CONFIG_INFO
- Stop 0×00000076 PROCESS_HAS_LOCKED_PAGES
- Stop 0×00000077 KERNEL_STACK_INPAGE_ERROR
- Stop 0×00000079 MISMATCHED_HAL
- Stop 0x0000007A KERNEL_DATA_INPAGE_ERROR
- Stop 0x0000007B INACCESSIBLE_BOOT_DEVICE
- Stop 0x0000007E SYSTEM_THREAD_EXCEPTION_NOT_HANDLED
- Stop 0x0000007F UNEXPECTED_KERNEL_MODE_TRAP
- Stop 0x0000008E KERNEL_MODE_EXCEPTION_NOT_HANDLED
- Stop 0x0000009C MACHINE_CHECK_EXCEPTION
- Stop 0x0000009F DRIVER_POWER_STATE_FAILURE
- Stop 0x000000BE ATTEMPTED_WRITE_TO_READONLY_MEMORY
- Stop 0x000000C2 BAD_POOL_CALLER
- Stop 0x000000C4 DRIVER_VERIFIER_DETECTED_VIOLATION
- Stop 0x000000CA PNP_DETECTED_FATAL_ERROR
- Stop 0x000000CB DRIVER_LEFT_LOCKED_PAGES_IN_PROCESS
- Stop 0x000000CE DRIVER_UNLOADED_WITHOUT_CANCELLING_PENDING_OPERATIONS
- Stop 0x000000D1 DRIVER_IRQL_NOT_LESS_OR_EQUAL
- Stop 0x000000D5 DRIVER_PAGE_FAULT_IN_FREED_SPECIAL_POOL
- Stop 0x000000D8 DRIVER_USED_EXCESSIVE_PTES
- Stop 0x000000DA SYSTEM_PTE_MISUSE
- Stop 0x000000EA THREAD_STUCK_IN_DEVICE_DRIVER
- Stop 0x000000ED UNMOUNTABLE_BOOT_VOLUME
- Stop 0x000000F2 HARDWARE_INTERRUPT_STORM
- Stop 0x000000FC ATTEMPTED_EXECUTE_OF_NOEXECUTE_MEMORY
- Stop 0x000000FE BUGCODE_USB_DRIVER
- Stop 0xC0000218 UNKNOWN_HARD_ERROR
- Stop 0xC000021A STATUS_SYSTEM_PROCESS_TERMINATED
- Stop 0xC0000221 STATUS_IMAGE_CHECKSUM_MISMATCH
- Stop 0xC0000244 STATUS_AUDIT_FAILED
Please share your own experiences with blue screen of death errors, including possible solutions. New insights can help others, or maybe we can help you with specific STOP errors.
Selengkapnya - How to Fix Blue Screen Errors

 Blue screen errors, or blue screen of death (BSOD) errors, are the most severe errors Windows can encounter. Since Windows can not recover from this kernel level error, a blue screen is displayed with the error details. The error details contain a STOP error code, which indicates the type of error.